
#API Integration
Start by signing up on The Bridge ↗, if you haven’t already. This is Setu’s single portal for managing all your integrations with us.
If you face any issues with integration, raise a support ticket ↗ and our team will reach out.
#Setup on The Bridge
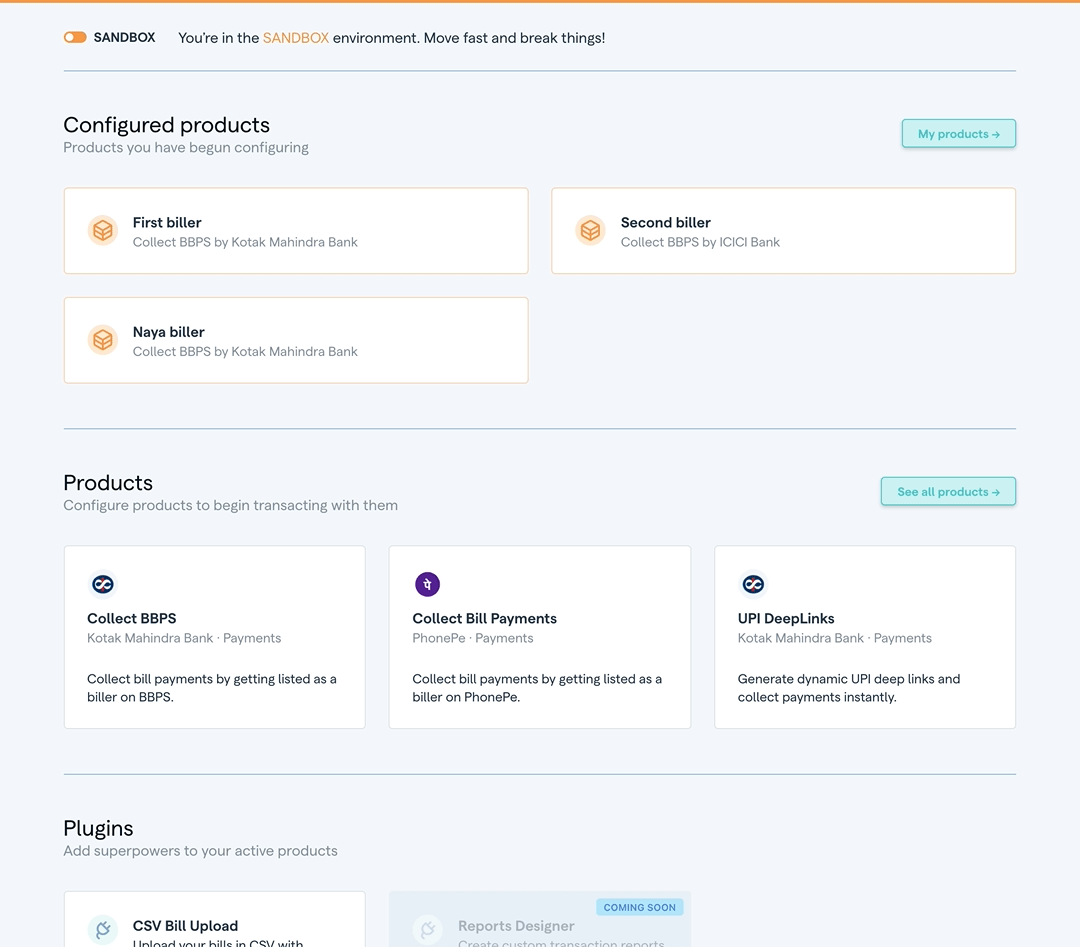
Step 1 — Create a biller
The primary entity on the BBPS network is called a “biller”. Go to the list of products offered by Setu, and select one of the product cards under Payments > Collect BBPS.
You will see multiple Collect BBPS cards, each by a different bank provider. While the underlying bank might differ, the product experience itself remains consistent across providers. Click on one of those cards, and you should see the full profile page with more details about the product. Click on the “Create a biller” button.
Here, enter the name of the biller. This is what your customers will see and search for in the payment apps, so make sure it has no errors.
Below that, select the category this biller belongs to. Right now Setu supports only two categories, but should begin adding more soon. Now click on the “Create biller” button.
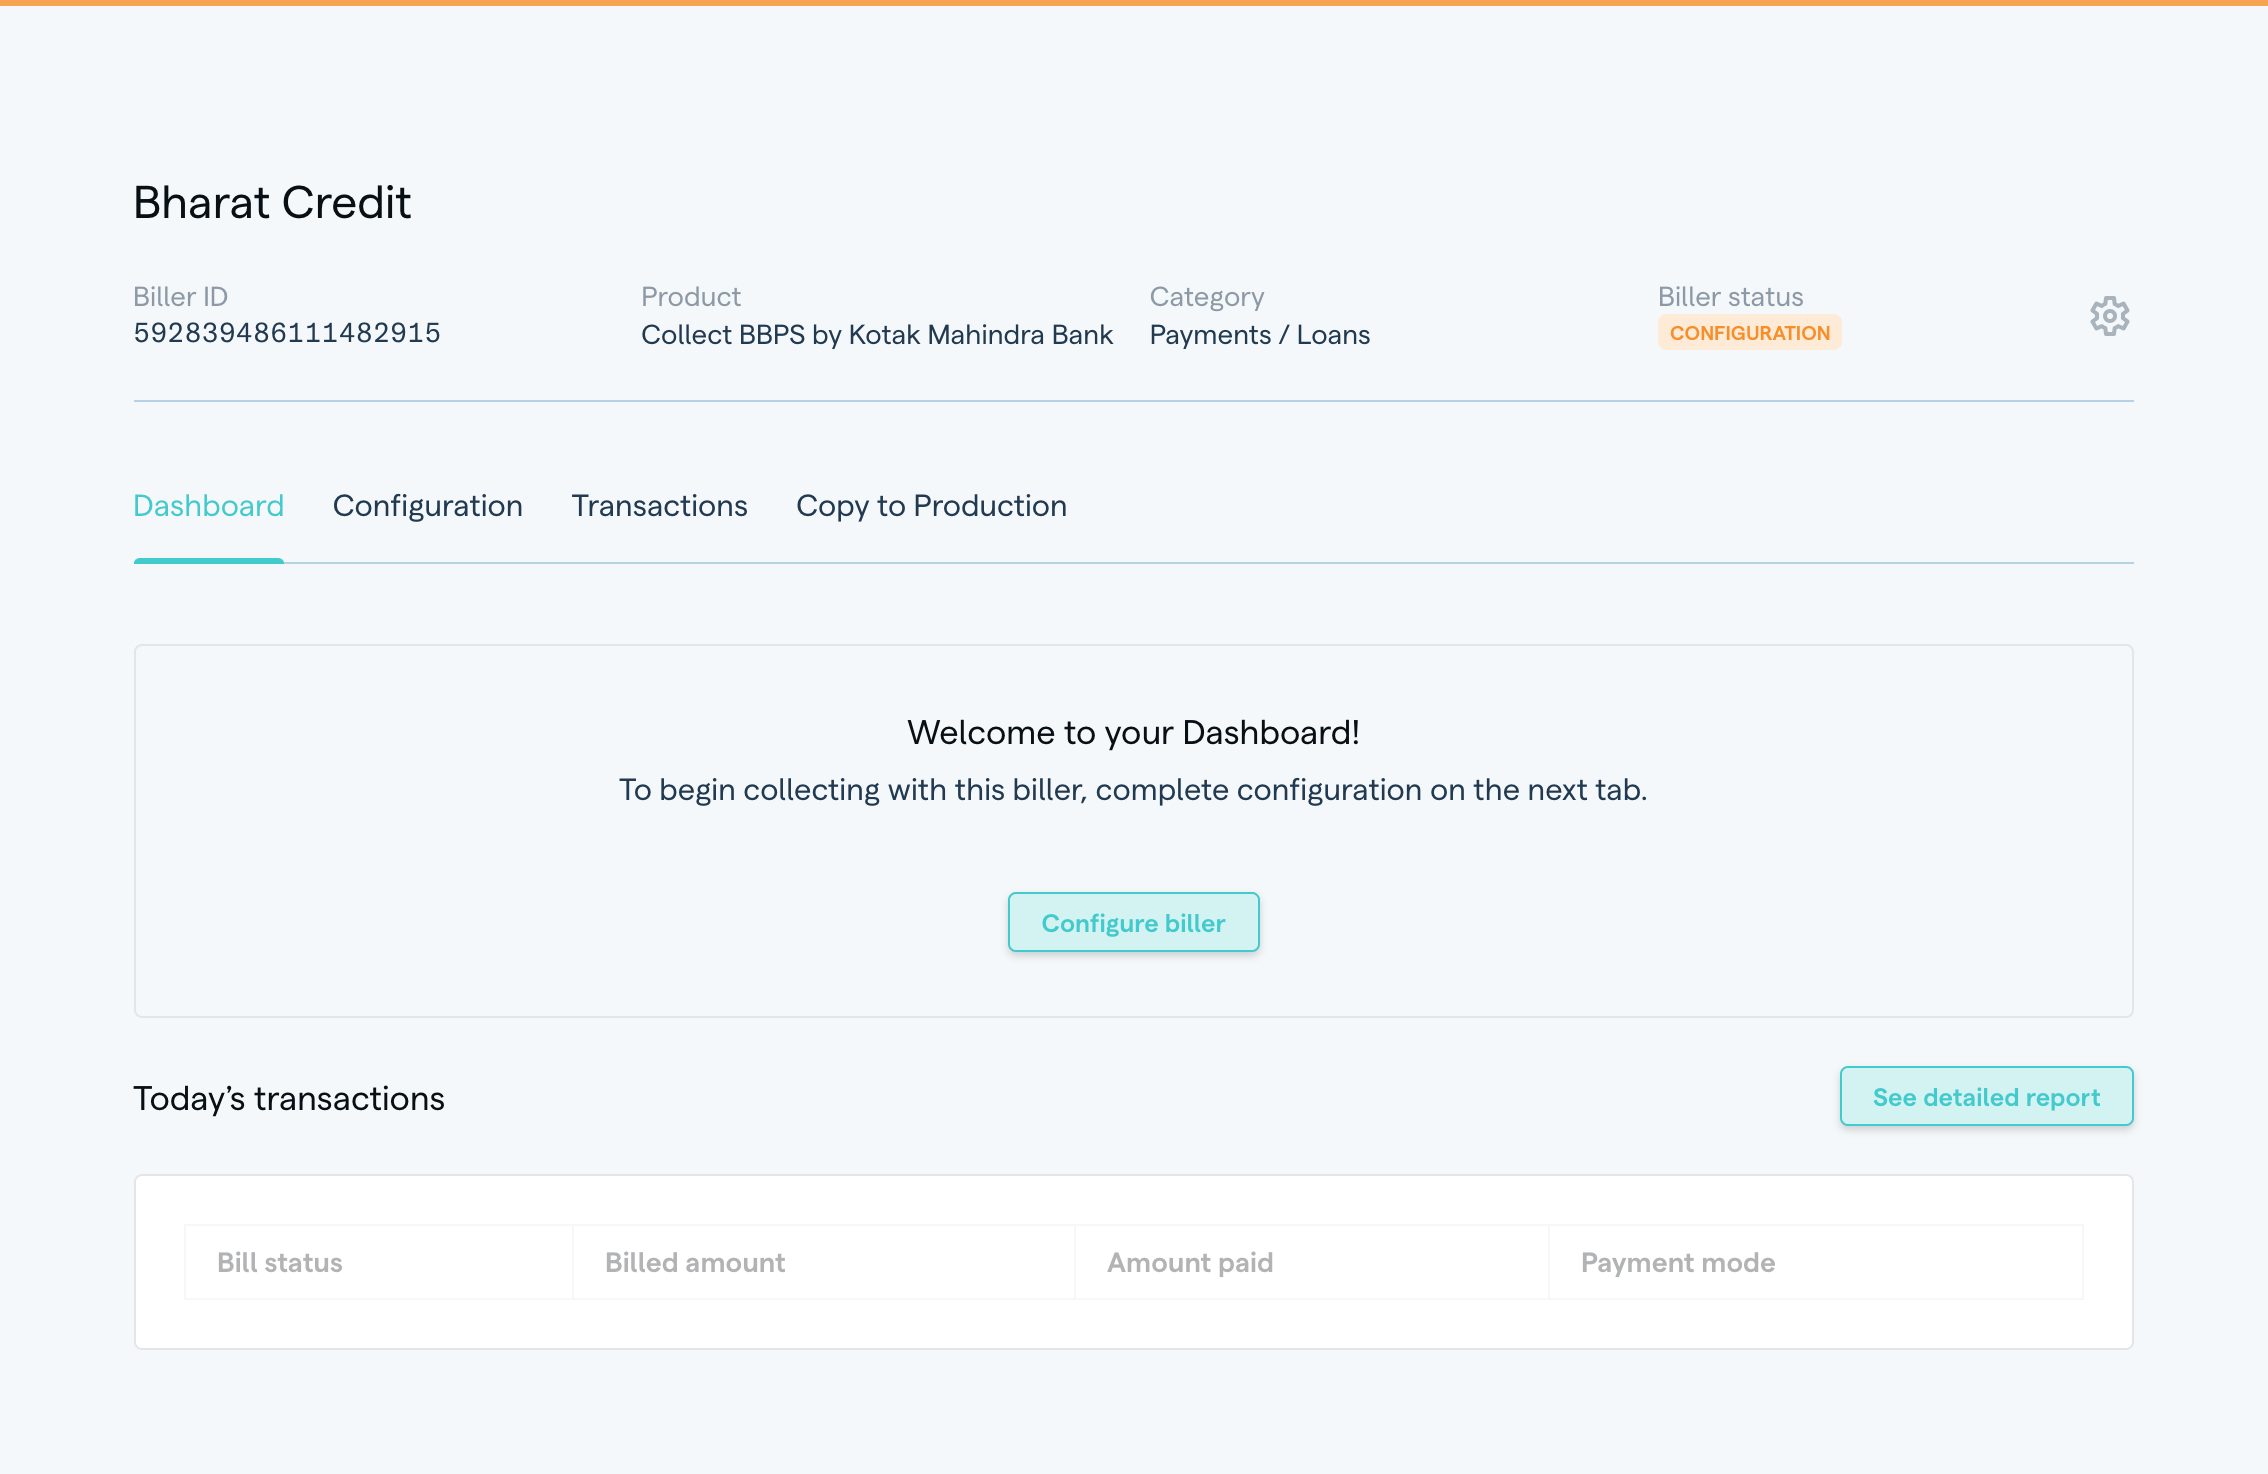
And done! The biller has been created, and you can proceed to the biller dashboard.
Step 2 — Add product configuration
Please note, any changes made to the Production configuration, will require approval from a Setu admin. Until approved, the changes will not be made live. This maker-checker process exists to ensure that there are no accidental updates to the configurations of live products.
The following explanation is done keeping in mind you’re in the Sandbox environment.
After the biller creation step, we should be on the biller profile. Here, you will see four tabs—Dashboard, which is an overview page, Configuration has all the integration details for this biller, Transactions where you can see test payments made to this biller, and Copy to Production, to copy the same config to Production later.
Click on the Configuration tab to begin setting up your biller. For a configuration to be complete, you need to—
- Add at least one customer identifier, which helps the payment app identify a specific customer, in order to pull their bills from the biller system. For example, a customer’s loan number might be used to retrieve their EMI payment.
- Setup URLs to tell Setu where to fetch the bills from the your system, and the auth mechanism. You can also optionally setup a callback URL to receive notifications.
- Add settlement accounts, for receiving funds from Setu once customers make a successful payment. In Sandbox, these would be only mock transactions.
Add customer identifier(s)
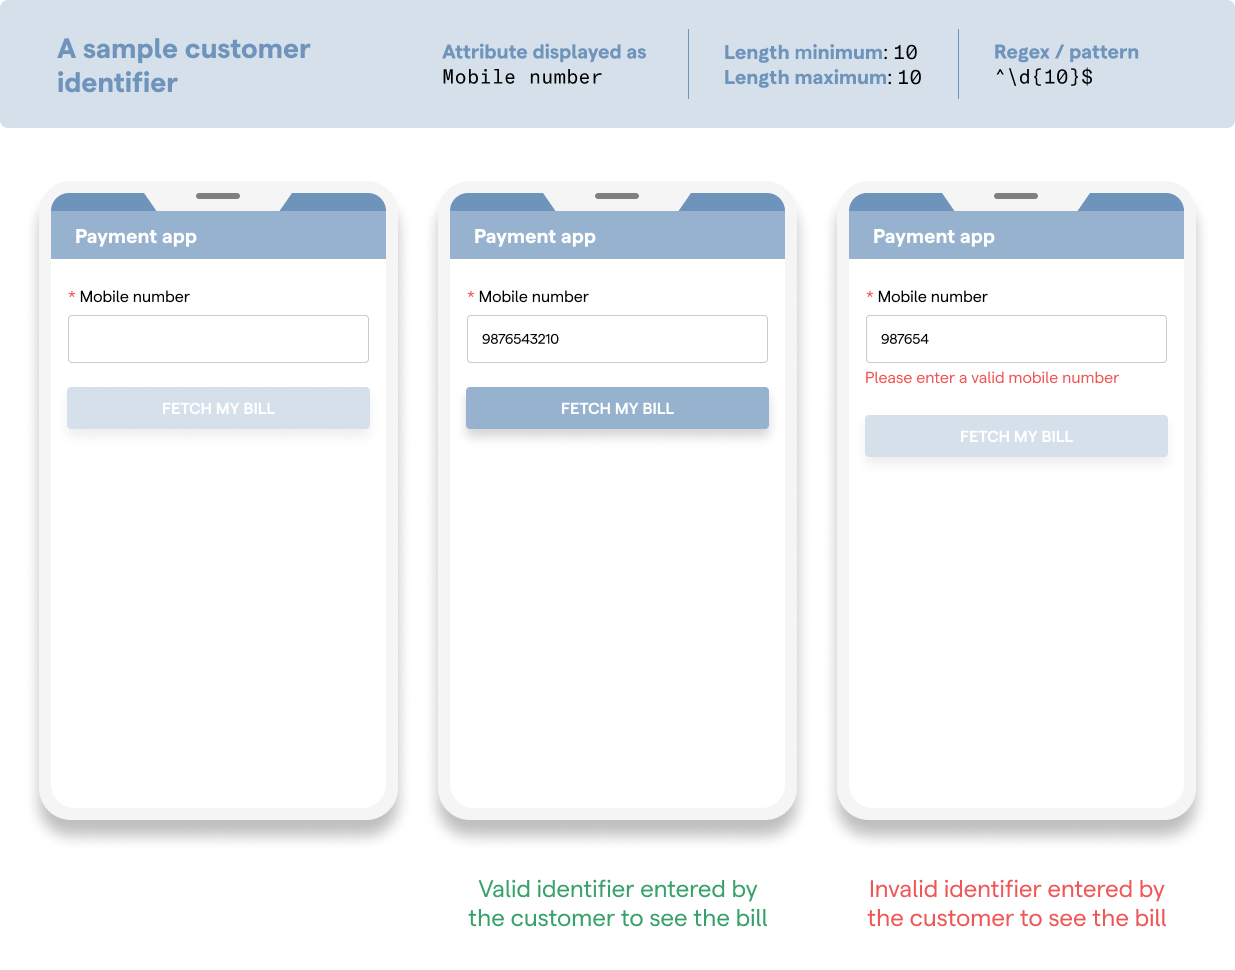
Begin by defining at least one identifier. An app like PhonePe or GPay will ask your customer to fill in a value against this identifier—that would be unique to that customer and help them fetch their own bill.
You can add up to 4 identifiers—mark them as mandatory or not mandatory, depending on the customer experience you want to give and APIs you build to support this. If you mark all identifiers as optional, the customer can enter any one of them in order to be identified and see the relevant bill.
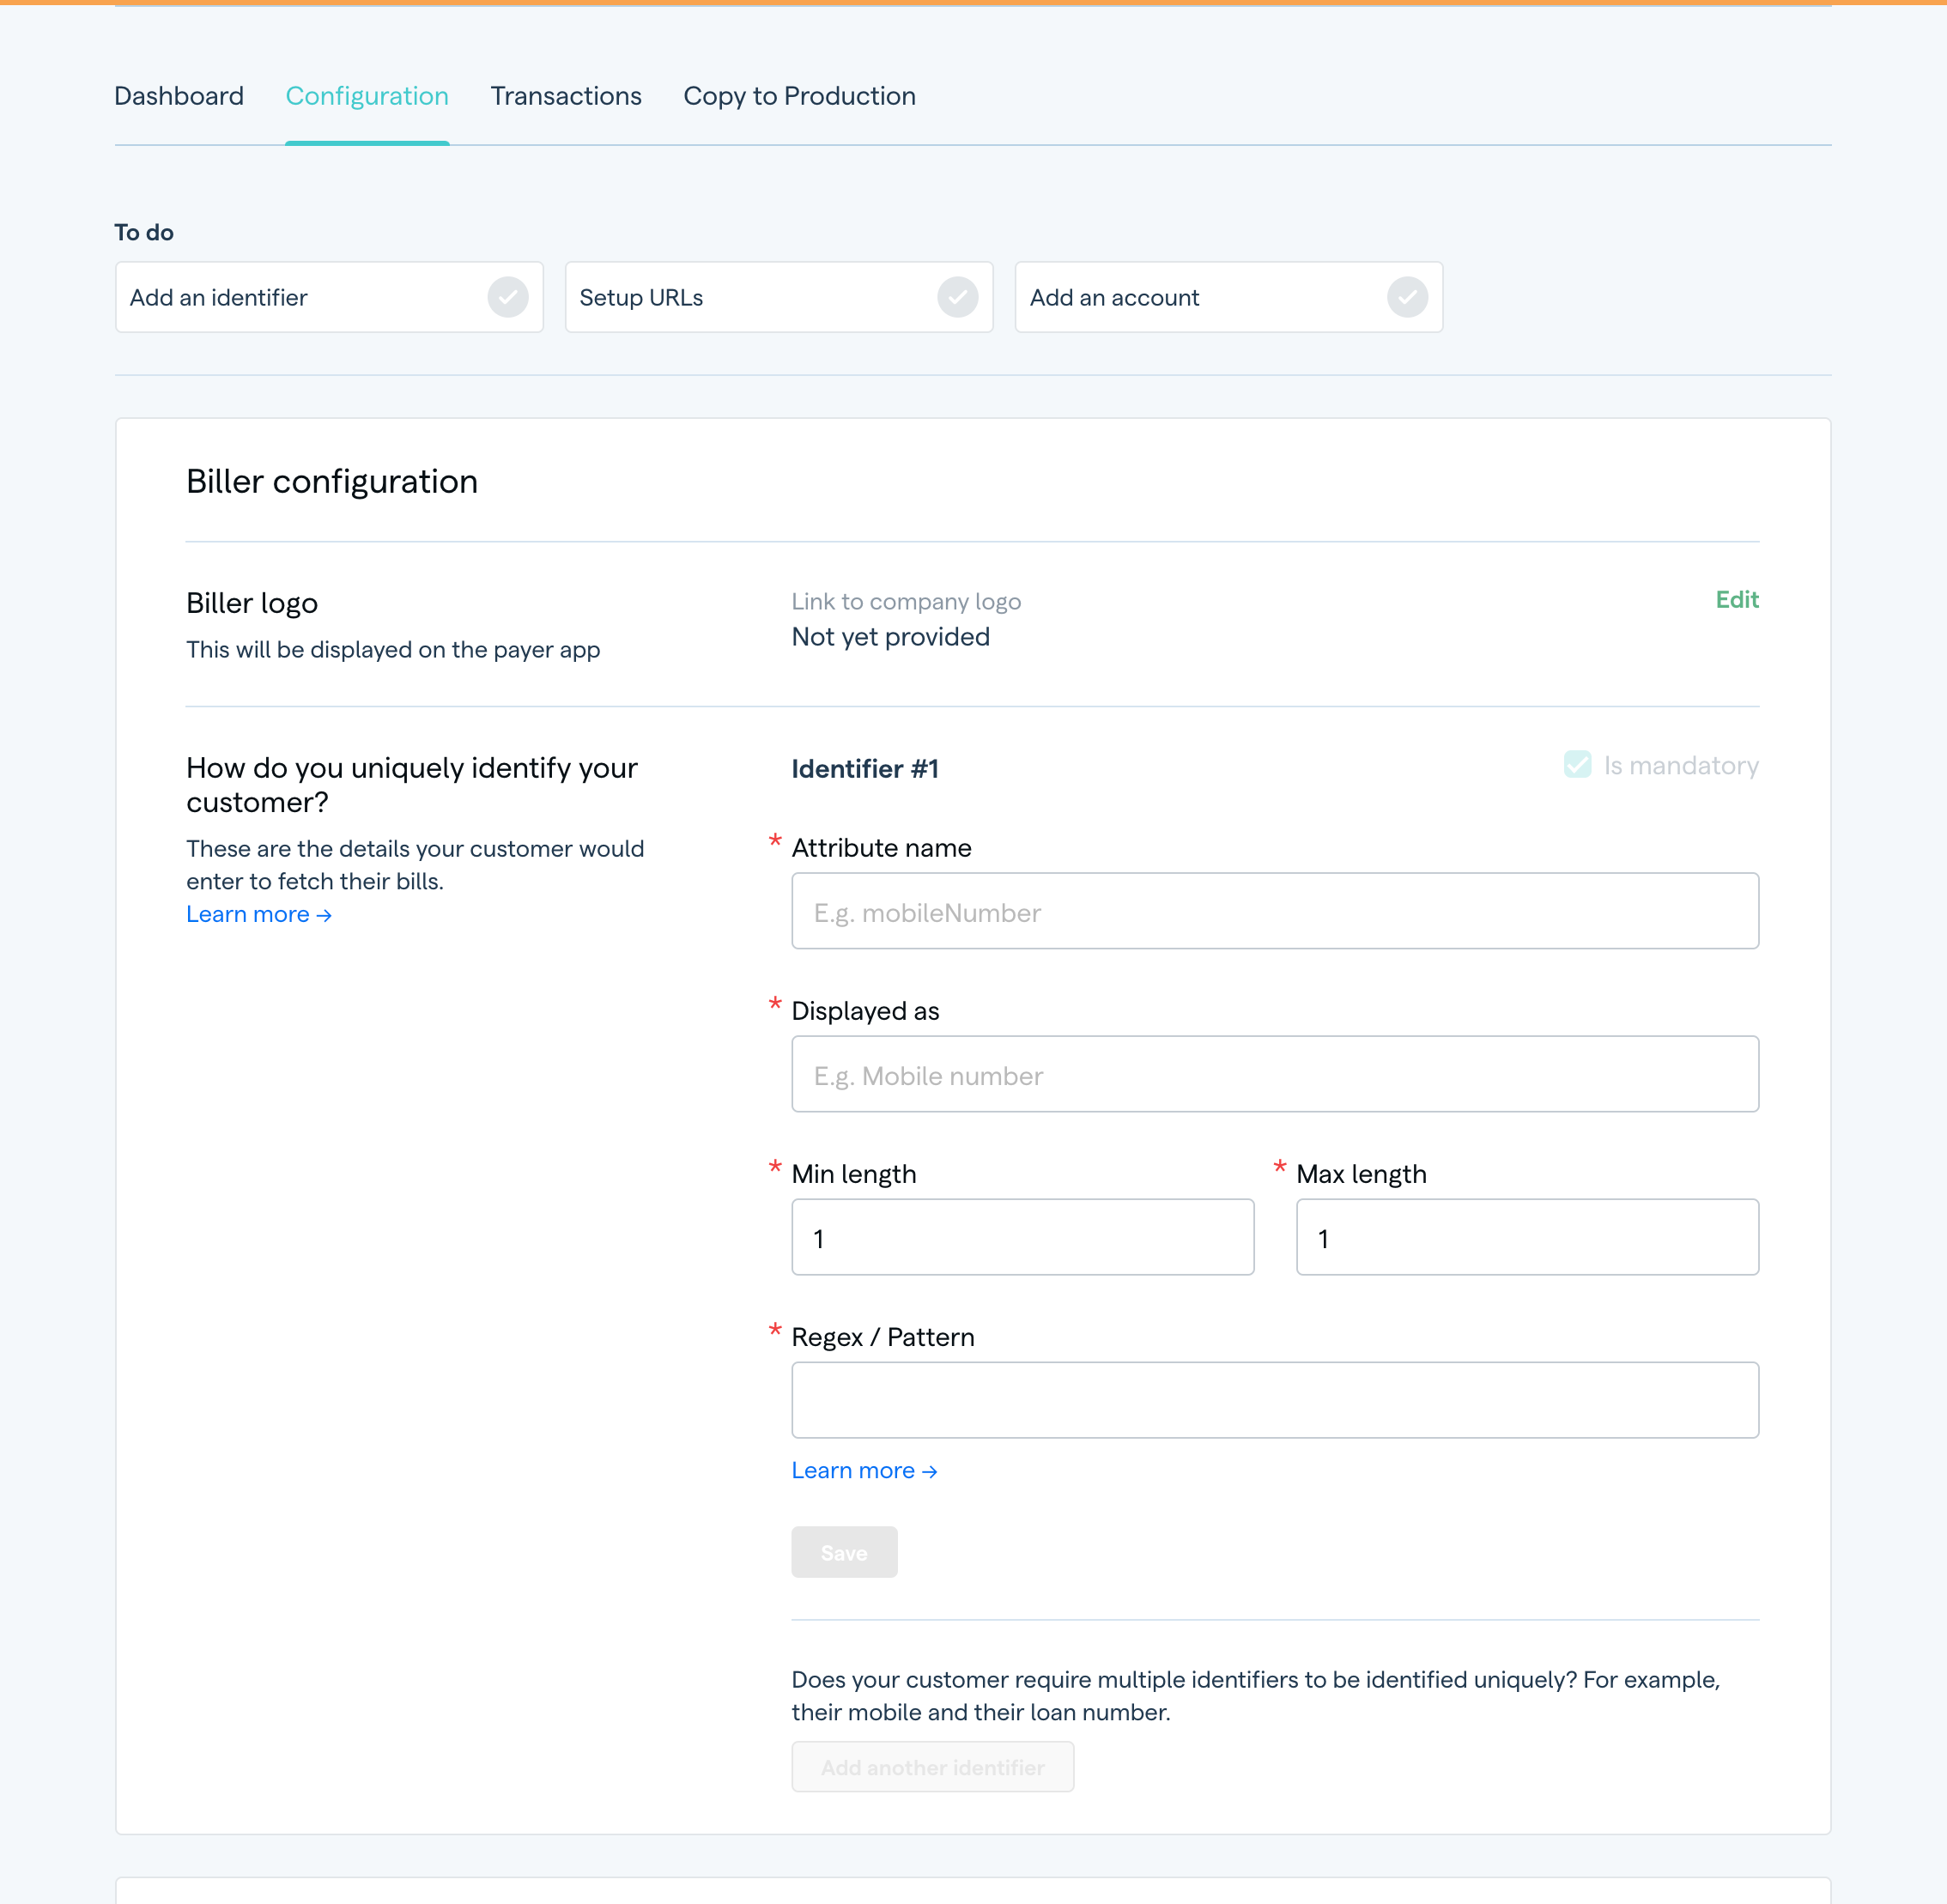
Attribute name is what your system recognises as the identifier to uniquely identify a customer.
Displayed as is what the user would see in an app like PhonePe or GPay.
Length denotes the minimum and maximum characters the customer can enter for the identifier.
Regex / pattern helps to check if the identifier entered by the customer is valid or not.
Once you enter these values, you can save it, and add another if you wish.
You can test customer identifiers that you configure, on Bridge. A sample app is available at the bottom-right of the screen on your configuration page, to test the integration.
Add URL endpoints
The baseURL is from where Setu can fetch bills and receipts from the biller system.
Setu will add /bills/fetch/ or /bills/fetchReceipt at the end of this URL.
The following web APIs need to be exposed by a Setu biller—
fetchCustomerBills↗ used to share a customer's bill(s) with the BBPS systemfetchBillReceipt↗ used to generate and access a receipt against a customer's payment
These will be invoked by BBPS via the Setu platform. More details on implementing these APIs have been provided below.
The callbackURL is for Setu to send notifications for BILL_SETTLEMENT_STATUS event only. If you want to implement this, read more here.
Please note, Setu will add /notifications at the end of this URL.
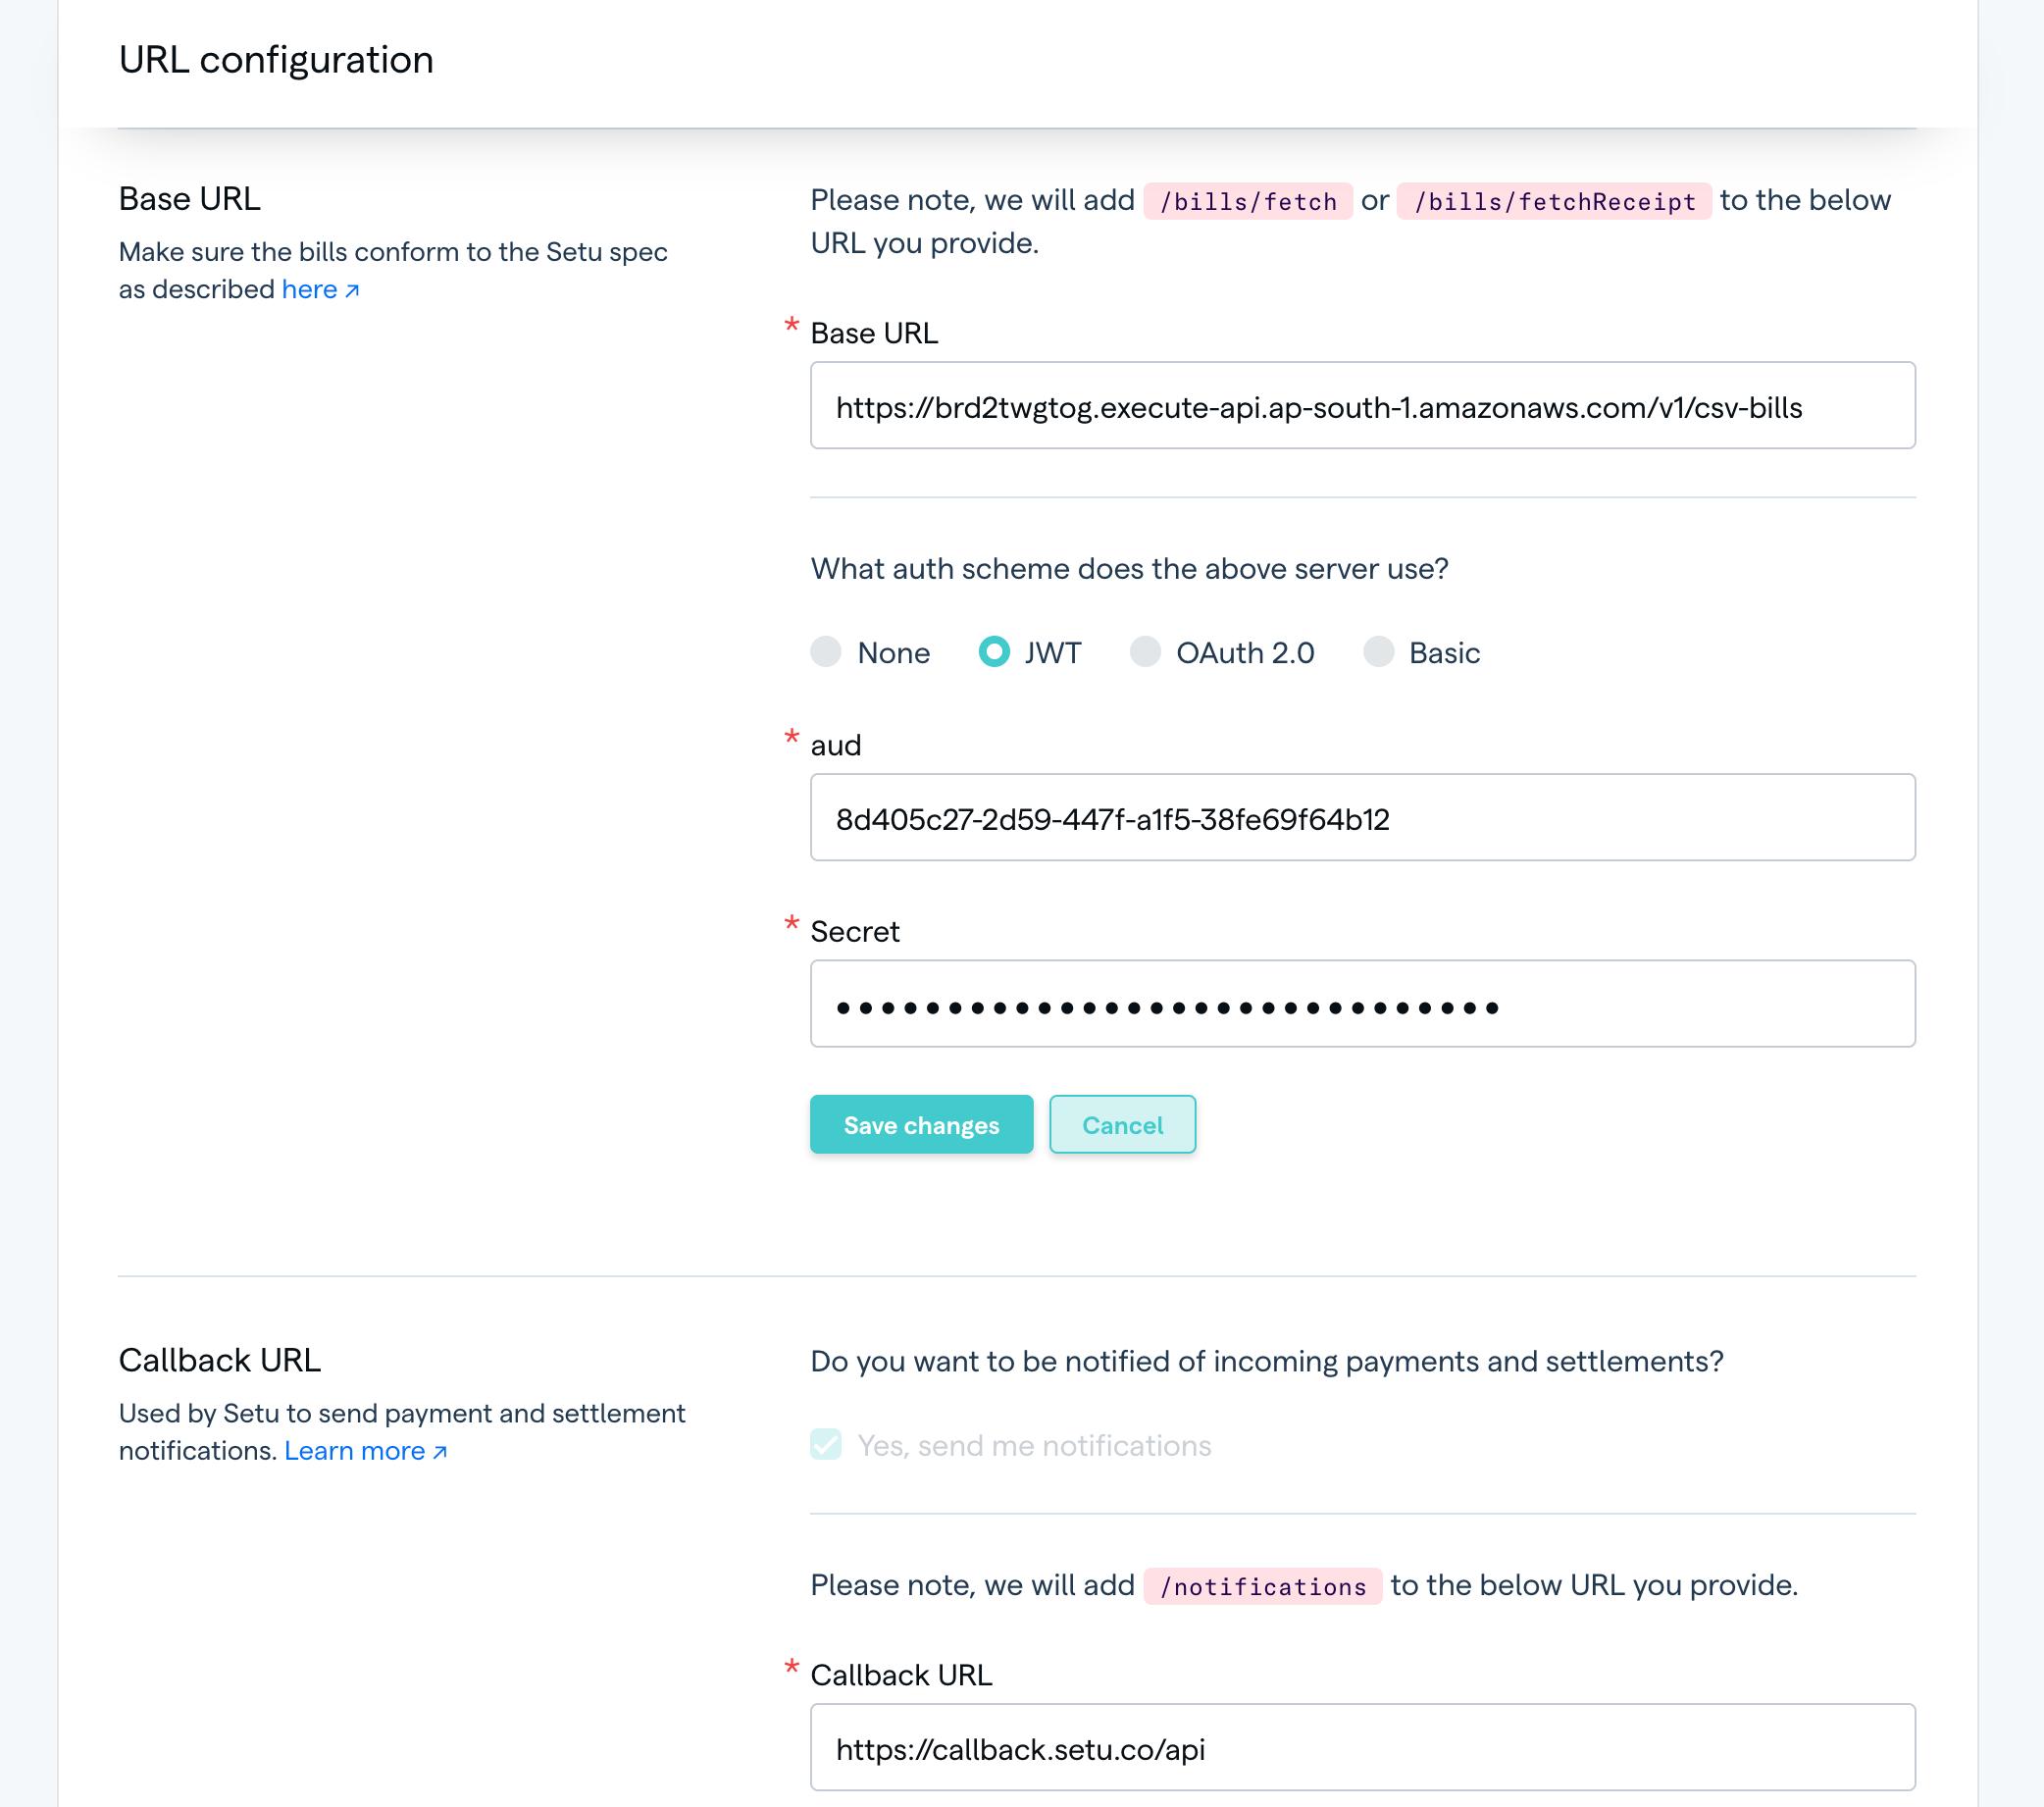
Setup the baseURL along with its auth scheme. Depending on the scheme you select, you would need to provide the corresponding credentials.
If you require notifications along with every settlement event, then setup the callbackURL as well.
Add settlement account(s)
Settlement accounts are where Setu will deposit money into after the customer has made the payment. Keep in mind that in Sandbox, these are mocked, and involve no money movement.

Add the account holder’s name, account number and IFSC. You can also add multiple accounts, and have funds split between them based on settlement instructions. Read more here.
Was this page helpful?